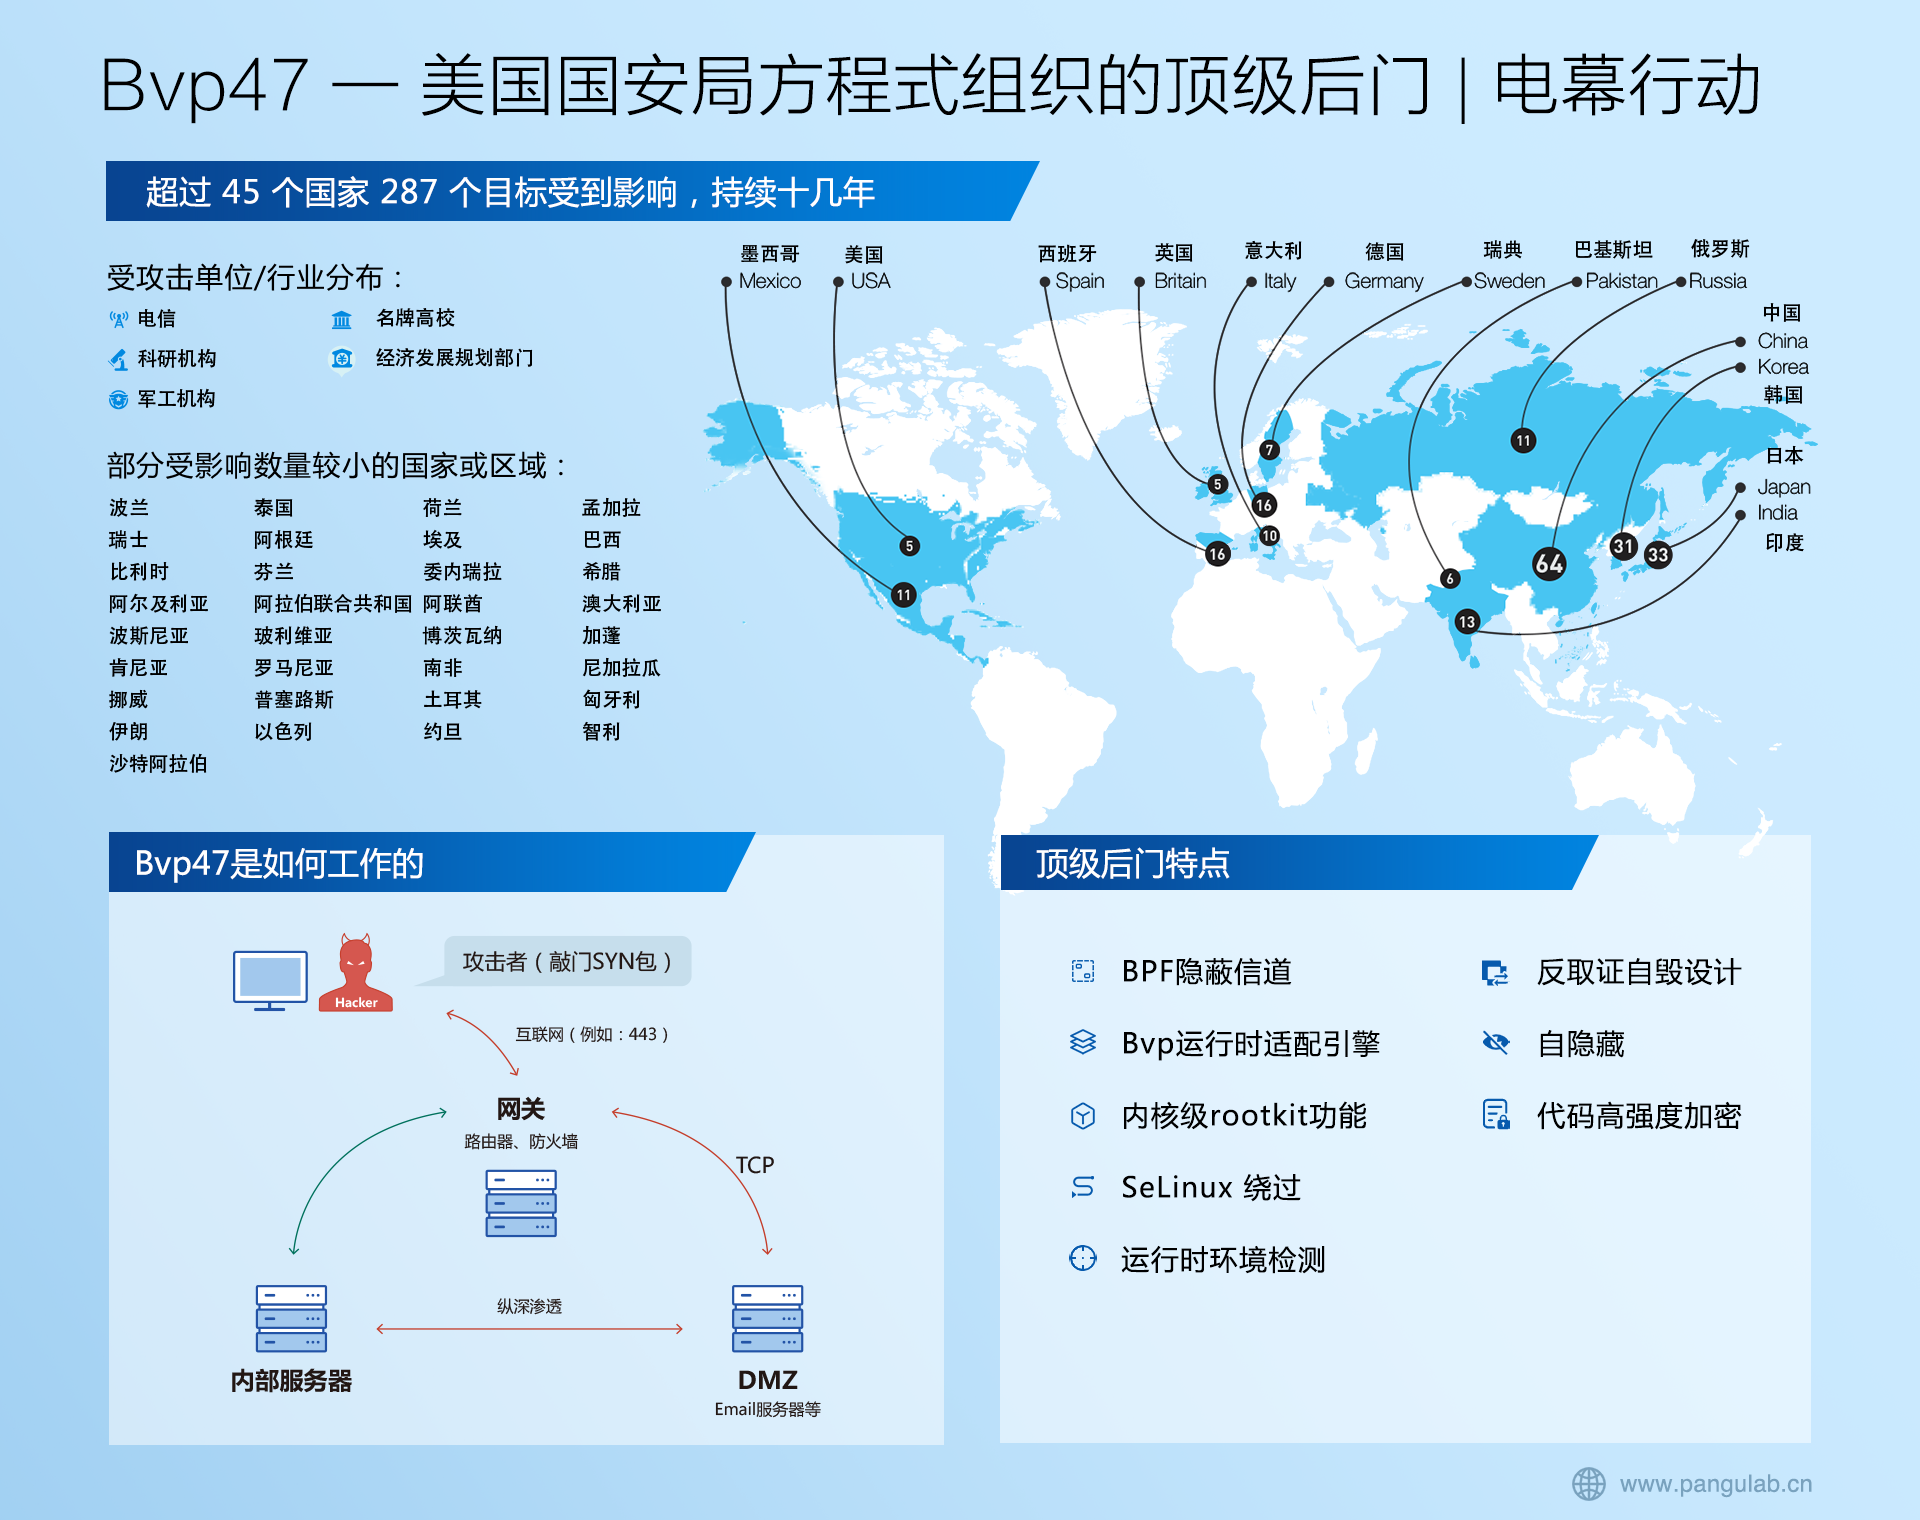

opencv图像特征融合-seamlessClone

相关标签: # less# 技术# 缺陷
seamlessClone是一种图像融合技术,使用此函数可以轻松将一幅图像中的指定目标复制后粘贴到另一幅图像中,并自然的融合。
函数说明:
- src: 输入8位3通道图像的贴图
- dst: 输入8位3通道图像的原图
- mask: 输入8位1或3通道图像(目标掩码区域图像)
- p: 对象被放置在目标图像dst中的位置
- blend: 输出图像,与dst具有相同大小和类型
- flags: 克隆方法可以是cv :: NORMAL_CLONE,cv :: MIXED_CLONE或cv ::MONOCHROME_TRANSFER
克隆方法1:NORMAL_CLONE: 不保留dst 图像的texture细节。目标区域的梯度只由源图像决定。
克隆方法2:MIXED_CLONE: 保留dest图像的texture 细节。目标区域的梯度是由原图像和目的图像的组合计算出来(计算dominat gradient)。
克隆方法3:MONOCHROME_TRANSFER: 不保留src图像的颜色细节,只有src图像的质地,颜色和目标图像一样,可以用来进行皮肤质地填充。
import cv2
import numpy as np
from math import sqrt
# 原图
img_back = cv2.imread(r"test.png")
# 贴图
img_obj = cv2.imread(r"defect_images/def3.png")
# 掩膜,确定贴图的ROI区域(0表示不需要的区域,255表示需要贴合的区域)
mask = 255*np.ones(img_obj.shape,img_obj.dtype)
# 获取原图宽高
width,height,channels = img_back.shape
# 粘贴位置
loaction = (height//2,width//2)
# 进行贴合
normal_clone = cv2.seamlessClone(img_obj,img_back,mask,loaction,cv2.MIXED_CLONE)
# 显示贴合结果
while (1):
    cv2.imshow('selectROI', normal_clone)
    if cv2.waitKey(1) & 0xFF == 27:  # Esc按下退出
        break

cv2.destroyAllWindows()
案例:
from tkinter import *
from tkinter.ttk import Combobox
from tkinter.filedialog import askopenfilename, asksaveasfilename
from PIL import Image,ImageTk
import cv2
import numpy as np
init_window = Tk()
# 实例一个主窗口
init_window.title('grid frames')
init_window.geometry('1000x600+200+70')
init_window.resizable(0,0)  # 禁止改变窗体大小

'''
全局变量
'''

frame1_img_path = ""


'''
辅助函数
fun1:打开目录
fun2
fun3

'''

'''
图像融合
'''
def imgs_merge():
    # 原图
    img_back = cv2.imread("test.png")
    # 贴图
    img_obj = cv2.imread("defect_images/def3.png")
    # 掩膜,确定贴图的ROI区域(0表示不需要的区域,255表示需要贴合的区域)
    mask = 255 * np.ones(img_obj.shape, img_obj.dtype)
    # 获取原图宽高
    width, height, channels = img_back.shape
    # 粘贴位置
    loaction = (height // 2, width // 2)
    # 进行贴合
    normal_clone = cv2.seamlessClone(img_obj, img_back, mask, loaction, cv2.NORMAL_CLONE)
    global frame1_mergeimg
    frame1_mergeimg = resize_img_to_canvas(normal_clone, frame_1_canvas.winfo_width(), frame_1_canvas.winfo_height())
    # img = cv2.imread(frame1_img_path)
    # img2 = cv2.resize(img, (), interpolation=cv2.INTER_LANCZOS4)
    # img3 = Image.fromarray(cv2.cvtColor(img2, cv2.COLOR_BGR2RGB))
    # # img3.show()
    # frame1_img = ImageTk.PhotoImage(img3)
    frame_1_canvas.create_image((0, 0), image=frame1_mergeimg, anchor="nw")


'''
打开图像文件路径
'''


'''
ReSize适应画布大小
'''
def resize_imgpath_to_canvas(img_path,width,height):
    img = cv2.imread(img_path)
    img2 = cv2.resize(img, (width, height),interpolation=cv2.INTER_LANCZOS4)
    img3 = Image.fromarray(cv2.cvtColor(img2, cv2.COLOR_BGR2RGB))
    # img3.show()
    img_resized = ImageTk.PhotoImage(img3)
    return img_resized

def resize_img_to_canvas(img,width,height):
    img2 = cv2.resize(img, (width, height),interpolation=cv2.INTER_LANCZOS4)
    img3 = Image.fromarray(cv2.cvtColor(img2, cv2.COLOR_BGR2RGB))
    # img3.show()
    img_resized = ImageTk.PhotoImage(img3)
    return img_resized

'''
切换图片
'''

'''
打开图像文件路径
'''
def open_imgfile():
    img_path = askopenfilename(
        title='请选择图片文件',
        # 筛选常见图片文件
        filetypes=[('图片', '.jpg .png .gif .bmp .jpeg')],
        )

    if img_path and img_path.endswith(('.jpg', '.png', '.gif', '.jpeg', '.bmp')):
        # 图像路径
        path = img_path
        # 图像文件夹路径
        # dir = path_split(path)[0]
        # print("message",path,dir)
        # canvas.delete("all")
        global frame1_img_path
        frame1_img_path = path
        print(frame1_img_path)
        global frame1_img
        frame1_img = resize_imgpath_to_canvas(frame1_img_path,frame_1_canvas.winfo_width(), frame_1_canvas.winfo_height())
        # img = cv2.imread(frame1_img_path)
        # img2 = cv2.resize(img, (), interpolation=cv2.INTER_LANCZOS4)
        # img3 = Image.fromarray(cv2.cvtColor(img2, cv2.COLOR_BGR2RGB))
        # # img3.show()
        # frame1_img = ImageTk.PhotoImage(img3)
        frame_1_canvas.create_image((0, 0), image=frame1_img, anchor="nw")


'''
布局配置
'''
# 第一行权重
init_window.grid_rowconfigure(0, weight=1)
# 第二行权重
init_window.grid_rowconfigure(1, weight=2)
# 第三行权重
init_window.grid_rowconfigure(2, weight=2)
# 第一列权重
init_window.grid_columnconfigure(0, weight=6)
# 第二列权重
init_window.grid_columnconfigure(1, weight=3)

# 只有对每一行每一列都设置了grid_row/columnconfigure才能实现frame大小的扩充,其中weight参数可以设置每一块的权重

frame_1 = Frame(init_window,padx=5,pady=5,bg='red')
frame_2 = Frame(init_window,padx=5,pady=5,bg='pink')
frame_3 = Frame(init_window,padx=5,pady=5,bg='peachpuff')
frame_4 = Frame(init_window,padx=5,pady=5,bg='green')


'''
frame1 : 画布:显示图像
'''
frame_1_canvas = Canvas(frame_1,bg="#123445")
frame_1_canvas.pack(fill=BOTH,expand=YES)


'''
frame2 :
1.画布:显示贴合的缺陷
2.label
3.下拉框
'''
frame_2_canvas = Canvas(frame_2,width= 150,height = 100, bg="#123445")
frame_2_label = Label(frame_2, text='图片格式:')

val = StringVar()
frame_2_Combobox = Combobox(frame_2, values=("jpg","png","bmp"),textvariable=val)

frame_2_canvas.pack(fill=BOTH,expand=YES)
frame_2_label.pack()
frame_2_Combobox.pack()


frame2_img = resize_imgpath_to_canvas("defect_images/def3.png",150,100)
frame_2_canvas.create_image((100, 10), image=frame2_img, anchor="nw")


'''
frame3 :
1.label
2.输入框:MaxCopyNum
3.label
4.输入框:ImgDir
5.label
6.输入框:OutDir
7.按钮:连续
8.按钮:单张
'''
frame_3_label1 = Label(frame_3, text='MaxCopyNum:')
Entry_MaxCopyNum = Entry(frame_3, width=10)
frame_3_label2 = Label(frame_3, text='ImgDir:')
Entry_ImgDir = Entry(frame_3, width=30)
frame_3_label3 = Label(frame_3, text='OutDir:')
Entry_OutDir = Entry(frame_3, width=30)
Button_Continue = Button(frame_3, text="          连续          ")
Button_Single = Button(frame_3, text="          单张          ")

frame_3_label1.pack()
Entry_MaxCopyNum.pack()
frame_3_label2.pack()
Entry_ImgDir.pack()
frame_3_label3.pack()
Entry_OutDir.pack()
Button_Continue.pack(side = RIGHT)
Button_Single.pack(side = LEFT)

'''
frame4 : 画布
1.label
1.输入框:DefectDir
1.label
2.输入框:OutDir
3.按钮:切换图片
4.按钮:切换缺陷
5.按钮:融合

'''

frame_4_label1 = Label(frame_4, text='DefectDir:')
Entry_DefectDir = Entry(frame_4, width=30)
frame_4_label2 = Label(frame_4, text='OutDir:')
Entry_OutDir = Entry(frame_4, width=30)
Button_ChangeImg = Button(frame_4, text="   切换图片   ",command=open_imgfile)
Button_ChangeDef = Button(frame_4, text="   切换缺陷   ")
Button_Merge = Button(frame_4, text="    融合    ",command=imgs_merge)


frame_4_label1.pack()
Entry_DefectDir.pack()
frame_4_label2.pack()
Entry_OutDir.pack()
Button_ChangeImg.pack()
Button_ChangeDef.pack()
Button_Merge.pack()
'''
布局挂载
'''
frame_1.grid(row=0,column=0, rowspan=4,sticky=NSEW)
frame_2.grid(row=0,column=1,sticky=NSEW)
frame_3.grid(row=1,column=1,sticky=NSEW)
frame_4.grid(row=2,column=1,sticky=NSEW)
# 这里的sticky参数也是必须的,相当于允许frame在什么方向扩充NSEW分别就是 北南东西

'''
运行界面
'''
init_window.mainloop()
文章来源: https://blog.51cto.com/u_15088375/5805510
特别声明:以上内容(图片及文字)均为互联网收集或者用户上传发布,本站仅提供信息存储服务!如有侵权或有涉及法律问题请联系我们。
举报